Transport Fever 3 guide: from your first cargo line to a profitable network
How to start Transport Fever 3, set up cargo lines, choose vehicles, handle congestion and grow cities, with illustrations and official references.
A beautiful network is not necessarily a good network. In Transport Fever 3, long trains, sprawling ports and grand airports can all become liabilities if they fail to move the right cargo to the right place at the right time.
Beginners should start small: make one transport line actually work, understand why it earns money, and only then expand. This guide follows that sequence.
Scope: compiled from Urban Games’ official developer blogs and gameplay videos, alongside community guidance; this is not a first-hand playtest diary. Mechanics are cited, while investment order and checklists are practical suggestions. Interface labels may vary by language or update.
Quick start: what should you do first?
- Play Campaign to learn the tools, or choose a small Tycoon map if you want to build independently.
- Read a city’s demand before looking for production sites.
- Open a simple cargo line, prioritizing existing roads and few transfers.
- Choose vehicles compatible with the cargo; observe a complete pickup and delivery cycle.
- Fix bottlenecks before buying more vehicles.
- Add public transport, maintenance coverage and city-rating checks.
- Introduce complex production chains only once the basic line is stable.
1. Choose a mode that fits your goal
The official information lists three modes: Campaign, Tycoon and Sandbox.[1]
- Campaign: a good fit when you want guided objectives to learn construction and operations.
- Tycoon: for managing finances, developing the world and progressing through company tiers.
- Sandbox: useful for testing designs, creating scenery or learning a system without budget pressure. The developer says players can disable costs and use world-editing tools.[3]
For your first session: pick a small or medium map with easy terrain, and avoid installing a long list of mods. Fewer variables make it easier to recognize a transport-line mistake rather than question every setting.
Do not aim to connect the entire map immediately. One well-served city is more useful than several connected by empty vehicles.
2. An important difference: cargo does not choose its own destination
If you have played Transport Fever 2, read this section carefully.
According to the industry developer blog, cargo in Transport Fever 3 is not assigned a destination when it is produced. It stays at its origin until collected, and you decide where it goes in your network.[2]
That means checking the whole chain:
Cargo source → pickup point → vehicle → delivery point → consumer.
Connected roads and moving vehicles are not enough if the destination does not need the cargo. Likewise, stock waiting at the source does not guarantee that your current vehicle can carry it.
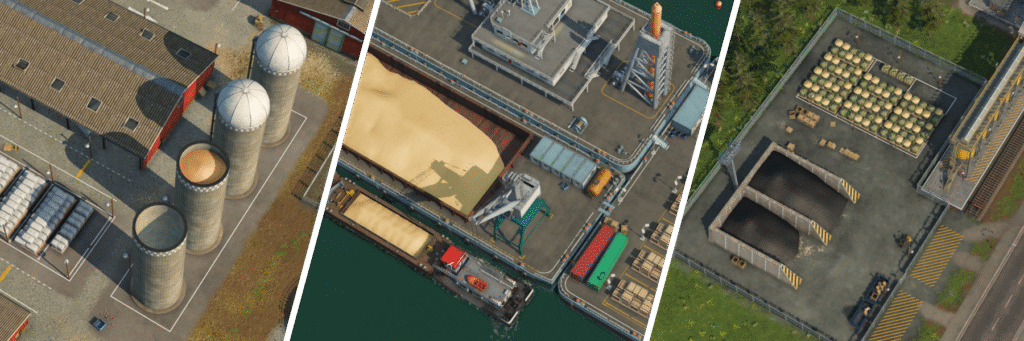
Cargo appears directly in the game world through silos, material piles and storage areas. Image: Urban Games, from the industries and cargo developer blog.[2]
Four cargo groups to distinguish
Transport Fever 3 divides cargo into liquid, bulk, flatbed and goods: liquids, loose bulk materials, loads suited to flatbeds, and packaged goods.[2]
When buying vehicles or adding loading modules, read the compatibility information rather than judging by appearance. A tanker is not a substitute for a vehicle carrying packaged goods.
- General-purpose vehicles: flexible and useful for testing a new line.
- Specialized vehicles: offer loading-speed advantages for their cargo group, but cannot carry every group.
- Specialized modules: must also match the cargo; upgrading the wrong type does not resolve a bottleneck.
3. Set up your first cargo line, step by step
Early on, cities need simple products such as fish, vegetables or planks; industries appear on the map according to demand. More complex chains develop as cities grow.[2]
So do not build a production chain merely because it looks interesting. Start with the buyer.
Step 1: check what the city needs
Open the city information, read cargo demand and identify a product with a feasible supply source. To try a vegetable line, make sure the city actually needs vegetables and the map has a suitable supplier.
Choose according to the current game, not a fixed recipe for every map.
Step 2: find supply and inspect the route
Prefer a source reachable by existing roads rather than one requiring mountain crossings or a large bridge at the start. Check access to the production site, traffic direction and the road to your delivery point.
A short distance does not guarantee profit, but usually makes a first session simpler: less new infrastructure, fewer transfer delays and easier troubleshooting.
Step 3: choose pickup and delivery points
Industries have integrated loading bays for a quick, inexpensive start, at the cost of slower loading than upgraded options. You can also build stations within an industry’s catchment area to improve handling capacity.[2]
At the receiving end, check whether the delivery point serves the intended consumer. Do not place a station near a building that looks like a customer and assume it is connected.
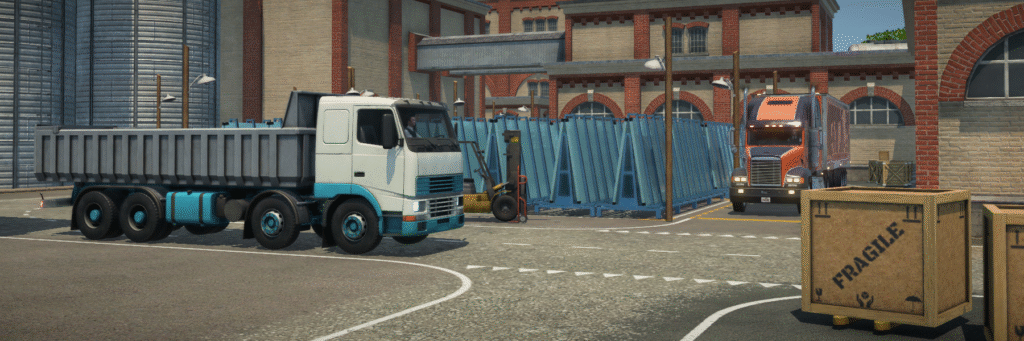
Loading bays can quickly become queueing bottlenecks as a fleet grows. Official illustration: Urban Games.[2]
Step 4: create the line and buy a small fleet
In the line-management tools, add pickup and delivery stops in the correct order, then assign compatible vehicles. Give the line a readable name such as “Vegetables — City A” so you can identify it later without guessing.
Do not buy in bulk yet. A small fleet is enough to test the route, collection and delivery.
Step 5: observe a complete operating cycle
Follow one vehicle as it reaches the source, loads, travels, delivers and returns. Ask yourself:
- Does it collect cargo?
- Does that cargo match the destination’s demand?
- Does it wait too long at the bay or get stuck on the road?
- Is the cargo delivered, or still aboard after the final stop?
- What revenue and operating costs does the line have?
Until you have seen one successful cycle, opening more lines usually makes troubleshooting harder.
4. Diagnose an operating line before buying more vehicles
Waiting cargo does not necessarily mean a shortage of vehicles. Loading may be slow, roads may be congested, or demand may be lower than you thought.
Stock grows, but vehicles are usually full and move freely
Consider increasing transport capacity: add a few vehicles or switch to a more suitable capacity. After each change, watch both stock levels and queues at the loading point.
Vehicles form long queues at the source
Buying more may make matters worse. Integrated bays are convenient but slow; as volumes rise, consider a dedicated station, simultaneous service capacity or specialized modules.[2]
The goal is to reduce time spent at the bay, not merely increase the number of vehicles you own.
Vehicles often carry small loads
Check production, destination demand and the current fleet size. You may have invested too much capacity in a small line. Reducing the fleet can make more sense than extending the route just to find work for it.
There is revenue, but finances remain poor
Do not look only at delivery income. Read operating costs, infrastructure expenses and any debt obligations. An earning line does not necessarily give the whole company enough cash flow to sustain every investment.
Rule: change one variable at a time, then observe. Replacing vehicles, stations and roads together leaves you unable to tell which change helped.
5. Transfer warehouses: useful, but not your first priority
Transport Fever 3 adds modular warehouses to store cargo and transfer it between lines. Warehouses can specialize in the four cargo groups, helping organize logistics hubs.[2]
A later network might look like this:
Several cargo sources → feeder lines → central warehouse → distribution lines → several cities.
However, each transfer adds another opportunity for delay and another place for a setup mistake. Direct transport is usually easier to learn for your first line.
When cargo gets stuck at a transfer point, check in order:
- Does the first line actually unload into the intended storage?
- Is the warehouse or module compatible with the cargo?
- Does the next line collect from that exact point?
- Can its vehicles carry the cargo?
- Does the final receiver need the product?
Community guidance also uses this link-by-link method to distinguish source, vehicle and warehouse problems.[5]
6. When should you switch to trains, ships or aircraft?
No vehicle type is best for every line. Choose according to volume, time, terrain and the cost of the whole system.
Trucks: testing lines and distributing cargo
Trucks are convenient when roads already exist, volumes are modest and several points need service. Obvious drawbacks include queues at bays and competition with urban traffic for road space.
Trains: when a corridor has clear demand
Consider rail when volumes are stable and you can afford tracks, stations and the necessary connections. Do not compare train capacity with trucks alone: a rail line with insufficient cargo still carries the cost of the infrastructure built for it.
If trains stop for long periods, check station access, the track ahead, direction of travel and signal layout. Do not place additional signals at random before understanding what is blocking the train.
Ships: trading speed for another transport option
The developer gives the example of bulk cargo such as stone having more time tolerance than food, so slower sea transport may be more economical than fast, expensive air transport.[3]
Still, include the journey to the port and from the port to the receiver. An otherwise sensible shipping leg can be undermined by congested roads at both ends.
Aircraft: not a cure for every late delivery
Before investing in an airport, determine whether cargo is late because of travel time or because it waits at bays and warehouses. A fast vehicle cannot fix a clogged handling system.
For players of previous installments: in an official developer-blog reply, Urban Games says cargo payments have changed so that taking cargo extremely far is no longer the strategy it once was; cargo complexity matters more.[3] Do not build detours expecting distance alone to guarantee higher income.
7. Cities grow through service quality, not just line counts
Transport Fever 3 connects city development to experience gained from passenger transport and delivery of needed cargo. Growth effectiveness is also influenced by six rating categories.[3]
Reputation
Major terrain changes or deforestation can upset residents. Choose lower-impact alignments where possible; planting trees is one way the developer mentions to improve reputation.
Satisfaction
Waiting time, travel time and vehicle comfort all deserve attention. A line with many stops may look comprehensive but make journeys too long.
Start with an understandable urban line connecting places with demand, then observe where passengers wait. When opening an intercity station, connect it to residential areas through local transport.
Delivery
Cargo has different expected delivery times. Late deliveries still generate revenue but reduce the city’s rating.[3] A growing bank balance therefore does not necessarily mean the supply chain is supporting city growth well.
Traffic
Population growth brings more journeys. Watch the intersections that actually clog up, provide public transport and avoid routing every freight vehicle through one urban corridor when a suitable alternative exists.
Noise
Noisy stations and infrastructure near homes can cause problems. Moving a hub farther away is an option, but increases access time and connection costs. This is a balance, not a rule that every station belongs on the outskirts.
Pollution
Pollution is measured across the entire managed urban region, so moving a facility just beyond the built-up area does not automatically remove its impact.[3] Read regional boundaries and relevant overlays before building.
When a city grows slowly, examine weak rating categories rather than simply buying more vehicles. A good transport network meets demand without creating too many side effects.
8. Do not forget maintenance
According to the official gameplay overview, vehicles receive automatic maintenance while operating within the coverage of a suitable facility. Neglected fleets gradually slow down and generate more noise and pollution.[4]
When opening a new line or extending an old one:
- Check that the maintenance facility suits the vehicle type.
- Check whether its coverage includes the fleet’s operations.
- Inspect vehicle condition if a once-reliable line has slowed down.
Do not replace the entire fleet because speeds have fallen before checking maintenance and congestion.
9. Introduce complex production chains as new demand appears
As cities grow, demand and industries change. Do not expect every production chain to exist at the start.[2]
The developer blog uses canned food as an example: tinplate is always needed for packaging, while the food can be meat, fish or a combination depending on raw-material availability and climate.[2]
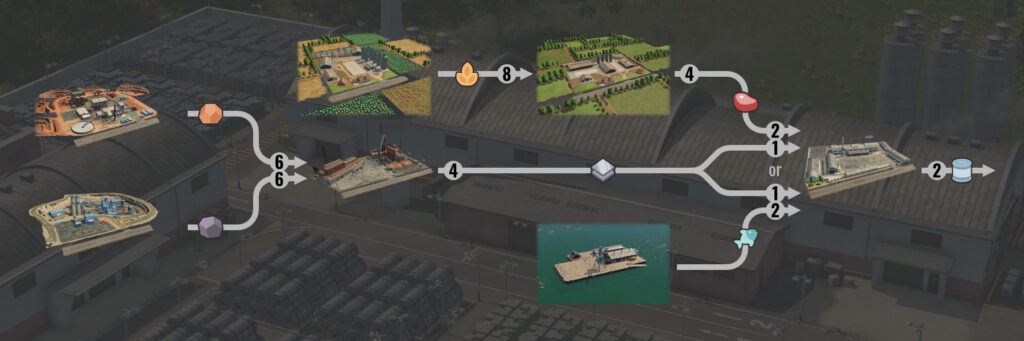
The official diagram shows several input branches for canned-food production. Ratios in the image belong to the developer-blog example; read the current in-game recipe before designing a line. Image: Urban Games.[2]
A lower-risk expansion process:
- Confirm that the city needs the final product.
- Read required inputs at each industry.
- Check that the raw-material sources actually exist on the map.
- Design each pickup and delivery leg, including warehouses if used.
- Observe shortages or excess stock at every link.
- Increase capacity only where it limits the whole chain’s output.
The developer also says transporting workers from cities can increase industrial output; some resource industries have supporting inputs such as fertilizer, tools or machine parts.[2] These are expansion options when production is genuinely insufficient, not a remedy for a blocked loading bay.
10. Troubleshooting common problems
Vehicles run empty or do not load
- Is cargo available at the source?
- Is the vehicle compatible with the cargo group?
- Is the pickup point connected to the correct source?
- Is the stop order correct?
- Does the destination need this cargo?
Plenty of stock, but slow deliveries
- Do vehicles wait too long at loading bays?
- Is there a queue at an intersection?
- Is a transfer warehouse accumulating cargo?
- Does a later leg have less capacity than an earlier one?
- Has maintenance been overlooked?
Lines earn revenue, but the company runs short of money
- Is the fleet larger than demand requires?
- Are many trips lightly loaded?
- Is new infrastructure too expensive for the line it serves?
- What are the current operating costs and financial obligations?
Cities are not growing as expected
- Are the required goods being delivered?
- Do passengers wait or travel too long?
- Are Delivery, Traffic, Noise or Pollution ratings poor?
- Has new demand appeared without being served by the network?
A plan for your first session
At the start: learn the tools, choose one city and open a simple cargo line.
Once it runs: follow a complete operating cycle, fix pickup and delivery mistakes, and address queues. Keep a cash reserve rather than spending everything on infrastructure.
Once it is stable: add passenger lines, check maintenance and read the city ratings.
After that: expand according to newly emerging demand. If you want to learn rail, ports or warehouses, try them separately in Sandbox before introducing an expensive design into Tycoon.
The most important thing is not rapid expansion, but knowing which link limits your network. Once you can explain why one line works well, reproducing it becomes much easier.
References and images
This is an English translation of the original Vietnamese guide, not a verbatim copy of another source. Sources were checked on 9 October 2026; developer blogs may describe pre-release designs, so current in-game interfaces and values take precedence when they differ.
- Urban Games — Press: Transport Fever 3 modes and information.
- Urban Games — Dev Blog, Episode 2: Industries and Cargo: cargo mechanics, loading bays, warehouses, vehicles and production chains. All three illustrations come from this source; image copyright belongs to Urban Games.
- Urban Games — Dev Blog, Episode 4: Tycoon: growth, the six rating categories, Sandbox and developer replies about transport revenue.
- Paradox Interactive — Tycoon Gameplay Overview: maintenance, company progression and management systems. Watch the official YouTube video.
- Transport Fever 3 Field Guide: independent community guidance on checking each transport link; some guides rely on preview versions and should not be the sole basis for specific values.